[Summer of API] Wanting to know more about meteorites?

When browsing the proposed open datasets, we was interested in having a look at what NASA provides. Of course, there are a lot of things about space but we can also find out some data about earth itself, specially about meteorites. This dataset can be reached at this address: https://data.nasa.gov/Space-Science/Meteorite-Landings/gh4g-9sfh.

We found that it would be fun to see on a map if some meteorites launded around and to play with such data. We are here typically in the context of the Summer of API!

All along the post, we will show how a Web API (and APISpark) can be useful to build the map and its components. We dont focus on the structure of the application itself. But dont worry, it will be the subject of a next post!

For a better understanding, here is the big picture of the application.

Lets start with the map itself.

Preparing the map

As you can see on the previous figure, there are two dedicated resources for maps:

  • One to list and create them
  • Another one to manage them (update, delete, )

To create our map, we will leverage the first one with the following content:

POST /maps/
(Content-Type: application/json)
{
    "id": "1",
    "name": "World",
    "type: "d3js",
    "projection": "orthographic",
    "scale": 250,
    "interactions": {
        "moving": "mouseMove",
        "zooming": "mouseWheel"
    }
}

This content gives some hints about the map we want to create like its projection, its initial scale and the way to interact wth it. We choose here to enable both zooming (with the mouse wheel) and moving (with dragn drop).

Whereas we have our map created, nothing appears since there is no content in it. Within our application, content corresponds to layers that can be map data like continents boundaries and raw data like rates or geographical positions (longitude, latitude).

We will now create all these layers.

Defining background layers

The projection orthographic is really great since it allows to see earth as a globe. To make this more beautiful, we will add some blue background for oceans and draw the shapes of continents.

To visualize the globe, we need first to create a graticule layer. This is the term for this in D3.js (http://d3js.org/), the underlying library we use.

Like for maps, we have similar resources for map layers. We have separate resources since layers can be used against several maps.

To create our layer, we will leverage the method POST of the list resource with the following content. We specify in some hints to configure what we want to display (background, lines and globe border) and some styles to define colors and line properties. Dont forget to set the identifier of the map as reference.

POST /layers/
(Content-Type: application/json)
{
    "id": "graticuleLayer",
    "type": "graticule",
    "name": "Graticule",
    "applyOn": "layers",
    "applied": true,
    "visible": true,
    "maps": [
        "067e6162-3b6f-4ae2-a171-2470b63dff00"
    ],
    "display": {
        "background": true,
        "lines": true,
        "border": true
    },
    "styles": {
        "background": {
            "fill": "#a4bac7"
        },
        "border": {
            "stroke": "#000",
            "strokeWidth": "3px"
        },
        "lines": {
            "stroke": "#777",
            "strokeWidth": ".5px",
            "strokeOpacity": ".5"
        }
    }
}

Now this first layer created. Our map looks like this.

Looks promising but there are still layers to define! The next step is to configure shapes for continents. D3 comes with a lot of samples of maps and specially, one for continents. The corresponding file provides data defined with format TopoJSON, (quoted from the TopoJSON web site).

Based on this file (that we imported within a folder of our Web API), we can create a new layer for GeoData. This layer is quite simple since we almost need to reference the file and tell the root object within the file we want to use (here countries).

POST /layers/
(Content-Type: application/json)
{
    "id": "worldLayer",
    "type": "geodata",
    "name": "World",
    "applyOn": "layers",
    "applied": true,
    "visible": true,
    "maps": [
        "067e6162-3b6f-4ae2-a171-2470b63dff00"
    ],
    "data": {
        "url": "http://mapapi.apispark-dev.com:8182/files/continent.json",
        "rootObject": "countries",
        "type": "topojson"
    }
}

Now this second layer created. We can see continents displayed on our map.

We have now the foundations of our map created. Lets actually dive into ou dataset.

Defining the layer for meteorites

We downloaded the file from the NASA web site. The file contains 34,513 meteorites and its structure is provided below:

  • name: the place where the meteorite fell
  • id: the identifier
  • nametype: is for most meteorites and are for objects that were once meteorites but are now highly altered by weathering on Earth
  • recclass: the type of the meteorite
  • mass: the mass of the meteorite (in grammes)
  • year: the year of fall
  • reclat: the latitude
  • reclong: the longiturde
  • GeoLocation: the complete geo location (latitude and longitude)

For simplicity, we directly uploaded the file of the dataset within a folder of our Web API with the path /data (its an example). We could go further and create a dedicated entity to store such data and upload then them using the bulk import of the entity browser. This will the subject of a next post

In attribute values, expressions can be provided. In this context, d corresponds to the current data of elements and contains all hints regarding this current row.

The first section of the layer configuration consists in data. We specify here the data file to load for this layer and some hints to filter and sort data. As a matter of fact, since there is an important gap within mass of meteorites, we need to display subset of data to make the map readable.

POST /layers/
(Content-Type: application/json)
{
    "id": "meteorites",
    "type": "data",
    "mode": "objects",
    "name": "Meteorites",
    "maps": [
        "067e6162-3b6f-4ae2-a171-2470b63dff00"
    ],
    "data": {
        "url": "http://mapapi.apispark-dev.com:8182/files/Meteorite_Landings.csv",
        "type": "csv",
        "source": "meteoritesSource",
        "where": "d.mass > 10000",
        "order": {
            "field": "mass",
            "ascending": false
        }
    },
    (...)
    "applyOn": "layers",
    "applied": true,
    "visible": true
}

The second section is about what we want to display and how. We want to draw a circle for each meteorite at the place where it fell. The radius of the circle is proportional with its mass and the background color dependent on the year of landing. The more the date is close from now, the more the color is close from red.

Color transition is handled by the threshold feature of D3 configured using a palette. Some beautiful palettes are provided by the link: http://bl.ocks.org/mbostock/5577023.

Following snippet provides the complete configuration of this shape:

{
    "id": "meteorites",
    "type": "data",
    "mode": "objects",
    "name": "Meteorites",
    "maps": [
        "067e6162-3b6f-4ae2-a171-2470b63dff00"
    ],
    (...)
    "display": {
        "shape": {
            "type": "circle",
            "radius": "d.mass / 5000000",
            "origin": "[ d.reclong, d.reclat ]",
            "opacity": 0.75,
            "threshold": {
                "code": "YlOrRd",
                "values": [ 1800, 1900, 1950, 2000, 2015 ],
                "colors": [ "#ffffb2", "#fed976", "#feb24c",
                                   "#fd8d3c", "#f03b20", "#bd0026" ]
            },
            "value": "parseDate(d.year).getFullYear()"
        }
    },
    (...)
    "applyOn": "layers",
    "applied": true,
    "visible": true
}

Now this third layer created. We can see where big meteorites fell on our map.

We can add more hints about the displayed data like the color legend and tooltip providing the complete data for the meteorite landing. To add this to the map, we simply need to add sections legend and tooltip, as described below. In this case, we need to leverage the method PUT of the single resource with the layer content. We can notice that all the content of the layer needs to be specified as payload of the request.

PUT /layers/meteorites
(Content-Type: application/json)
{
    "id": "meteorites",
    "type": "data",
    "mode": "objects",
    "name": "Meteorites",
    "maps": [
        "067e6162-3b6f-4ae2-a171-2470b63dff00"
    ],
    (...)
    "display": {
        (...)
        "legend": {
            "enabled": true,
            "label": "d"
         },
         "tooltip": {
            "enabled": true,
            "text": "'Name: '+d.name+'<br/>Year: '+d.year+'<br/>Mass (g): '+d.mass"
        }
    }
    (...)
}

To finish, lets configure the interaction of the layer. It simply corresponds to specify that we want to display the tooltip area when clicking on circles.

{
    "id": "meteorites",
    "type": "data",
    "mode": "objects",
    "name": "Meteorites",
    (...)
    "behavior": {
        "tooltip": {
            "display": "click"
        }
    },
    (...)
}

Lets have a look at our map.

The big advantage of such approach is that we can easily configure the data to display and the way to display them to be relevant. We will show now how to play with subsets of data.

Playing with data

As we can see, there is an important gap between masses of meteorites. In last sections, we mainly displayed the big ones. Restricting the data to display small ones allows to show a different representation of meteorites datas.

We will display here meteorites that have mass inferior to 50kg. We simply need to update the attribute where in the section data: instead of . In this case, we need to increase a bit the radius of displayed circles: instead of .

Below are the two updated sections within the map definition:

{
    (...)
    "data": {
        "url": "http://mapapi.apispark-dev.com:8182/files/Meteorite_Landings.csv",
        "type": "csv",
        "where": "d.mass < 50000",
        "order": {
            "field": "mass",
            "ascending": false
        }
    },
    "display": {
        "shape": {
            "type": "circle",
            "radius": "d.mass / 50000",
            "origin": "[ d.reclong, d.reclat ]",
            "opacity": 0.75,
            "threshold": {
                "code": "YlOrRd",
                "values": [ 1800, 1900, 1950, 2000, 2015 ],
                "colors": [ "#ffffb2", "#fed976", "#feb24c",
                                  "#fd8d3c", "#f03b20", "#bd0026" ]
            },
            "value": "parseDate(d.year).getFullYear()"
        },
        (...)
    },
    (...)
}

By reloading data, we have now the following map.


In this case, the map is less reactive since there are much more data to display. Some optimizations would be interesting like only applying data on the map for the displayed area.

In a future post, we will describe the APISpark Web API itself, its structure and the way to interact with it.

Posted in APISpark, Dataviz, Summer of API, Web API | Tagged , , , | 1 Comment

[Summer of API] Apisparkifying Angular applications

For the Summer of API, Im implementing an Angular application (see my first post on the subject) to display open data on maps in a convenient way. I want to use all the classical tools provided by the community to make my development life easier.

Concretely, Im using Yeoman with the Angular generator. This means that the project structure was generated for me. In addition Yeoman leverages tools like NPM and Bower for dependencies and also Grunt for the build script. Yeoman also configured the project to be able to use LiveReload and build / optimize it for production.

In this context, implementing the application is really convenient with the local server. To deploy the application within an APISpark Web API, we need however to make some adjustments to follow its required structure and restrictions:

  • No support of hierarchical folders
  • No possibility to put files at the root of the path

This means that I need to define several folders for the following contents:

  • html for the HTML elements
  • images for the images
  • scripts for the JavaScript files
  • styles for the CSS files

I dont have problems for the two last ones since Grunt will gather code within a minimum set of files and no sub folders will be required in them. Here is a sample content for these folders:

dist/
  scripts/
    scripts.e5b45497.js
    vendor.59008981.js
  styles/
    main.9dcbb5ce.css
    vendor.8fe9e3e1.css

For the folder images, if we are a bit careful (not use sub folders), there is also no problem. Contrariwise,

For the folder html, things are a bit more tricky. As a matter of fact, the files are present at the root folder. So we need to copy them into the folder html and update the links to related JS and CSS files. For this, we will show how to implement and use a very simple Grunt task apisparkify.

You can also notice that there is also a folder views in the folder dist. We will use Angular template preloading in order not to have to use it after deploying.

Preloading Angular views

To preload Angular views, we can use the tool grunt-html2js to integrate such processing directly within the build chain. The installation of this tool can be simply done within the file package.json, as described below:

{
    (...)
    "devDependencies": {
        (...)
        "grunt-html2js": "0.3.2",
        (...)
    }
    (...)
}

Simply type then the following command to install the tool within your project:

npm install

Then you need to configure this tool within your Gruntfile file. This consists in loading the tool, defining its configuration within the function grunt.initConfig and finally add it within the task processing flow.

module.exports = function (grunt) {
    // Define the configuration for all the tasks
    grunt.initConfig({
        (...)

        html2js: {
            options: {
                base: 'app',
                module: 'mapManager.templates',
                singleModule: true,
                useStrict: true,
                htmlmin: {
                    collapseBooleanAttributes: true,
                    collapseWhitespace: true,
                    removeAttributeQuotes: true,
                    removeComments: true,
                    removeEmptyAttributes: true,
                    removeRedundantAttributes: true,
                    removeScriptTypeAttributes: true,
                    removeStyleLinkTypeAttributes: true
                }
            },
            main: {
                src: ['app/views/**/*.html'],
                dest: 'app/scripts/templates.js'
            },
        }
    });

    grunt.loadNpmTasks('grunt-html2js');

    (...)

    grunt.registerTask('test', [
        'clean:server',
        'wiredep',
        'concurrent:test',
        'autoprefixer',
        'html2js',
        'connect:test',
        'karma'
    ]);

    (...)

    grunt.registerTask('build', [
        'clean:dist',
        'wiredep',
        'useminPrepare',
        'concurrent:dist',
        'autoprefixer',
        'html2js',
        'concat',
        'ngAnnotate',
        'copy:dist',
        'cdnify',
        'cssmin',
        'uglify',
        'filerev',
        'usemin',
        'htmlmin'
    ]);

    (...)
};

You can notice that we only add the task html2js task within the build one. As a matter of fact, we only need to compile views into JavaScript when executing the application within APISpark. Its not necessary for development with command grunt serve.

As you can see, we specify a module name for the generated template source code. To actually use this source code, we need not to forget to do two things.

The first one is to Add the generate JavaScript file (here app/scripts/templates.js) within our file index.html, as described below:

<html>
    (...)
    <body>
        (...)
        <!-- build:js({.tmp,app}) scripts/scripts.js -->
        (...)
        <script src="scripts/templates.js"></script>
        <!-- endbuild -->
    </body>
</html>

The second one is to define the module as dependency of our Angular application within our file app/scripts/app.js, as described below:

angular
    .module('mapManagerApp', [
        (...)
        'mapManager.templates'
    ])
    .config(function ($routeProvider) {
        (...)
    });

Now this is completed, we need to tackle HTML files to be able correctly load and use the Angular application.

Configuring HTML files

As described previously, we need to implement following processing within the build chain:

  • Create a folder dist/html
  • Copy the file index.html from folder dist to dist/html
  • Update the references on files JS and CSS within the copied file index.html

For this, we will create a custom Grunt task. We will leverage the utility functions of Grunt relative to files and folders and the library Cheerio to parse and update links within the HTML file. Following snippet describes the implementation of this custom task:

grunt.registerTask('apisparkify', function() {
    var fs = require('fs');
    var $ = require('cheerio');

    // Create an html directory
    grunt.file.mkdir('dist/html');
    grunt.log.ok('Created folder dist/html');

    // Copy the index.html file into the created folder
    grunt.file.copy('dist/index.html', 'dist/html/index.html', {});
    grunt.log.ok('Copied file dist/index.html to folder dist/html');

    // Update links in it
    var indexFile = fs.readFileSync('dist/html/index.html').toString();
    var parsedHTML = $.load(indexFile);

    parsedHTML('script').each(function(i, elt) {
        var wElt = $(elt);
        var srcAttr = wElt.attr('src');
        if (srcAttr != null) {
            wElt.attr('src', '../' + srcAttr);
        }
    });
    grunt.log.ok('Updated script tags');

    parsedHTML('link').each(function(i, elt) {
        var wElt = $(elt);
        var hrefAttr = wElt.attr('href');
        if (hrefAttr != null) {
            wElt.attr('href', '../' + hrefAttr);
        }
    });
    grunt.log.ok('Updated link tags');

    fs.writeFileSync('dist/html/index.html', parsedHTML.html());
    grunt.log.ok('Written updated file dist/index.html');
});

Now the Grunt task is implemented, we need to put it within the task processing chain. We put it at the very end of the task build, as described below:

grunt.registerTask('build', [
    'clean:dist',
    'wiredep',
    'useminPrepare',
    'concurrent:dist',
    'autoprefixer',
    'html2js',
    'concat',
    'ngAnnotate',
    'copy:dist',
    'cdnify',
    'cssmin',
    'uglify',
    'filerev',
    'usemin',
    'htmlmin',
    'apisparkify'
]);

Lets deal now with the way to deploy the Angular application within the APISpark platform.

Deploying the frontend application

Now we did the work, installing the application on the APISpark platform is quite easy! We simply need to upload files within corresponding folders. We use the same names as those generated by Grunt when creating our Web API. Uploading can be done either using the file brower of the underlying file store used or directly using the Web API with paths corresponding to folders.

As a reminder, we described in the previous post the structure of our Web API and how to create them.

This part isnt really handy and boring so we need to industrialize using scripts. In our next post, we will describe the implementation of a Node application:

  • To create the different cells used by our Web API and link them together
  • To create simply the data schema using JSON sample data files
  • To install the front end application
Posted in Angular, APISpark, Summer of API, Tips | Tagged , , , , | 1 Comment

[Summer of API] Let’s start to code

Last month, Restlet and API Evangelist launched a virtual hackaton: Summer of API. The latter is focused on implementing a Web API that aims to build an API project to expose an Open Data set. This lasts all summer so it lets the time to think about a real project, design it properly and finally implement it!

They suggested the following dataset: Open datasets suggestion list. This contains some really cool data to display, for example from NASA.

Ideas and features

Some times ago, I played a lot with the D3 library and its support of TopoJSON. This also to build and display awesome maps and to display datasets on them.

I think that you see me coming. My idea in the context of the hackaton would be to provide a generic online tool to mix maps and data without having to write a single line of code. As a matter of fact, when creating such maps using JavaScript and D3, there are some roundtrips to finalize the display. Such tool would allow (and help) the end user to make this online.

Under the hood, the application will leverage layers of data. So you can pick data up from different sources and aggregate them to display something like in the following picture.

This can be done using a set of layers described below.

Layers could be pure map data, shapes (like polygons, circles, and so on) or processing to fill areas. For the two last ones, properties could be dependent on values of a particular dataset.

This application would be a Single Page Application (SPA) implemented using the JavaScript framework Angular and would interact with a Web API defined and hosted by APISpark. This platform will also host the Web application.

The project

The project is open-source and hosted on Github (https://github.com/templth/geo-open-data-viz).

In addition to the application itself, some stuff will be provided to install the application effortlessly and manage the dataset.

Finally, I will try to give some details about the way to design and implement the application with APISpark!

Posted in Angular, APISpark, Dataviz, Summer of API, Web API | 2 Comments

Permissions in RESTful services

RESTful services are independent from clients. That means that services can be consumed by different clients like applications, UIs, and so on.

In the case of UIs, you need to take into account permissions in order to only provide the actions the user is allowed to use. This prevents from having a button or a link displayed in the UI and when the user clicks on it, a forbidden message is displayed. Such issue is mandatory when an application uses a Web API / RESTful service and supports users with different roles like admin and read-only for example.

Using permission resources

Dedicated resources can be provided to return specific permission, permissions for a domain or all permissions. On their side the resources of the application must leverage these permissions to check if they can be executed or not in the context of a particular user.

A dedicated resource is provided to get the permissions, as described below:

GET /permissions
[
  contacts:access:read
  contacts:access:write
  contacts:access:delete
  companies:access:*
  (...)
]

Filtering must be also supported to get only a subset of permissions, as described below:


GET /permissions?categories=contacts
[
  contacts:access:read
  contacts:access:write
  contacts:access:delete
  (...)
]

We can notice that permissions arent directly linked to UI issues but are related to elements of the Web API and what we cant do on them.

Using such approach, were able to get a set of permissions using only one call.

Leveraging the OPTIONS method

The HTTP OPTIONS method can be also used to determine communication requirements and the capabilities of the server without having to retrieve or perform an action on a resource. In conjonction with the header Allow, this can allow to return back the permissions associated with the resource, i.e. which methods the current user is allowed to call.

This header contains a list of HTTP methods, in fact, the ones that can use, i.e. the existing ones and the ones youre authorized.

The following request can be done like that:

OPTIONS /somepath

The corresponding response is described below. In this case, all methods can be used for the resource

HTTP/1.1 200 OK
Allow: HEAD,GET,PUT,POST,DELETE,OPTIONS

Lets take now a concrete sample. We have two resources:

  • One regarding a list of contacts – method GET to get a list of contacts and method POST to add a contact
  • One regarding a single contact – method GET to get the contact, methid POST / PATCH to update (fully / partially) the contact and DELETE to delete the contact

See this link for more details: https://templth.wordpress.com/2014/12/15/designing-a-web-api/.

If the current user has read-only permissions, he / she will have the following responses when using the method OPTIONS for these two resources:

OPTIONS /contacts
(...)
Allow: GET,OPTIONS

OPTIONS /contacts/contactid
(...)
Allow: GET,OPTIONS

The main drawback of this approach is that its per resource and you cant have all permissions for a specific domain in one call.

Posted in Web API | Leave a comment

Checking your JavaScript code

Checking your JavaScript code

Following code guidelines and best practices is an important aspect of project development. This allows to detect potential bugs and prevent from using bad practices. Another aspect is preventing from tricky merges if you work within a team.

Such aspects are also obviously true for JavaScript applications (both client and server sides) and tools exist to ensure that application code is well-writen and to detect potential problems even before executing the application. Recall that JavaScript applications arent compiled so most of problems of syntax (like a missing bracket or ). Its something that can easily happens because of callback imbrications.

With JavaScript, there are some tools to check such aspect. The most well-known is JSHint. There is another interesting one that allows to check the style of your code: Jscs. These two tools are complementary and allow to detect different things: Jscs is more focused on the code style (indentation, length of lines, ) and JSHint on detecting errors and potential problems.

Installing code checking tools

These two tools can be easily installed using NPM. What you need not to forget is to install them globally to be able to use then within the text editor or IDE.

Here are the command lines to install them:

npm install jscs -g
npm install jshint -g

Thats all. The two tools are now ready to be used.

Configuring tools within your project

The Jscs rules must be configured with a file named .jscsrc within the root folder of your project. The good news is that the tool provides some presets for particular environment. You can get the right one for you and then adapt it more finely for your exact needs. All the presets are available at this link: http://jscs.info/overview.html.

We choose the node-style-guide one here:

{
    "disallowKeywords": ["with"],
    "disallowKeywordsOnNewLine": ["else"],
    "disallowMixedSpacesAndTabs": true,
    "disallowMultipleVarDecl": "exceptUndefined",
    "disallowNewlineBeforeBlockStatements": true,
    "disallowQuotedKeysInObjects": true,
    "disallowSpaceAfterObjectKeys": true,
    "disallowSpaceAfterPrefixUnaryOperators": true,
    "disallowSpacesInFunction": {
        "beforeOpeningRoundBrace": true
    },
    "disallowSpacesInsideParentheses": true,
    "disallowTrailingWhitespace": true,
    "maximumLineLength": 80,
    "requireCamelCaseOrUpperCaseIdentifiers": true,
    "requireCapitalizedComments": true,
    "requireCapitalizedConstructors": true,
    "requireCurlyBraces": true,
    "requireSpaceAfterKeywords": [
        "if",
        "else",
        "for",
        "while",
        "do",
        "switch",
        "case",
        "return",
        "try",
        "catch",
        "typeof"
    ],
    "requireSpaceAfterLineComment": true,
    "requireSpaceAfterBinaryOperators": true,
    "requireSpaceBeforeBinaryOperators": true,
    "requireSpaceBeforeBlockStatements": true,
    "requireSpaceBeforeObjectValues": true,
    "requireSpacesInFunction": {
        "beforeOpeningCurlyBrace": true
    },
    "validateIndentation": 2,
    "validateLineBreaks": "LF",
    "validateQuoteMarks": "'"
}

The JSHint tool leverages a file named .jshintrc also within the root folder of your project. You can find below a classical configuration file for this tool:

{
    "node": true,
    "browser": true,
    "esnext": true,
    "bitwise": true,
    "curly": true,
    "immed": true,
    "indent": 2,
    "latedef": true,
    "newcap": true,
    "noarg": true,
    "regexp": true,
    "strict": true,
    "trailing": true,
    "smarttabs": true,
    "laxbreak": true,
    "laxcomma": true,
    "quotmark": "single",
    "unused": true,
    "eqnull": true,
    "undef": true,
    // "eqeqeq": true, // TODO to restore after migration
    //
    "globals": {
        "angular": false,
        "_": true,
        "moment": true,
        "$": false,
        "Stripe": false,
        "ngGridFlexibleHeightPlugin": false,
        "describe": true,
        "it": true
    }
}

There are mainly two ways to use these tools: from command line and within your favorite text editor / IDE

Using command lines

The two tools provide command line utilies to launch them and display the errors for your project.

Here is the way to use JSHint:

$ jshint lib/**.js test/**/**.js

lib/client.js: line 241, col 26, 'createParameters' was used before it was defined.
lib/client.js: line 211, col 52, 'response' is not defined.
lib/client.js: line 225, col 52, 'response' is not defined.
lib/client.js: line 233, col 54, 'response' is not defined.
lib/client.js: line 20, col 10, 'isReadMethod' is defined but never used.
lib/client.js: line 160, col 10, 'extractName' is defined but never used.

lib/data.js: line 162, col 30, 'ALL' is not defined.
lib/data.js: line 162, col 44, 'ALL' is not defined.
lib/data.js: line 194, col 30, 'ALL' is not defined.
lib/data.js: line 194, col 50, 'included' is not defined.

lib/headers.js: line 290, col 16, 'values' is already defined.
lib/headers.js: line 268, col 56, 'ifUnmodifiedSinceHeader' is not defined.

Here is the way to use Jscs:

node_modules/jscs/bin/jscs *.js lib/*.js test/server/*.js

Line must be at most 80 characters at lib/server.js :
73 | * all registered servers are also started and the same for stopping.
74 | *
75 | * The simplest way to add a server is to provided a protocol and the associated port, as described below:
----------------------------------------------------------------------------------------------------------------------^
76 | *
77 | * component.addServer('http', 3000);

Missing space after line comment at lib/server.js :
94 | */
95 | addServer: function(protocol, port) {
96 | //TODO: support configuration object as second parameter
--------------^
97 | serverConfigurations.push({
98 | protocol: protocol,

Expected indentation of 6 characters at lib/server.js :
95 | addServer: function(protocol, port) {
96 | //TODO: support configuration object as second parameter
97 | serverConfigurations.push({
--------------^
98 | protocol: protocol,
99 | port: port


3 code style errors found.

Additionally you can add these command lines directly within the file package.json of your project to make them more convenient to use:

{
  "name": "myproject",
  "description": "Project description",
  "version": "0.4.1",
  (...)
  "scripts": {
    "code:jshint": "jshint lib/**.js test/**/**.js",
    "code:style": "node_modules/jscs/bin/jscs *.js lib/*.js test/server/*.js"
  }
}

Here is the new way to launch them:

$ npm run code:jshint
(...)
$ npm run code:style

You can also notice that main JavaScript task runner like Grunt or Gulp provide support to such tools.

Here is a sample configuration within a file Gruntfile.js for a Angular application generated using Yeoman:

jshint: {
  options: {
    jshintrc: '.jshintrc',
    reporter: require('jshint-stylish')
  },
  all: {
    src: [
      'Gruntfile.js',
      '<%= yeoman.app %>/scripts/{,*/}*.js'
    ]
  },
  test: {
    options: {
      jshintrc: 'test/.jshintrc'
    },
    src: ['test/spec/{,*/}*.js']
  }
}

The main drawback is that this approach isnt so much convenient and can discourage developers. As a matter of fact, you need to execute the command, note the line of the problem go into the corresponding file, fix it and then go again into the console to see the next error and so on. You can have the feeling of wasting time and, when you have one hundred errors (this can come up quickly), fixing all is very boring. Most of time, you give up (me first!).

Hopefully there is another way to fix these errors. This definitively reconcile me with such tools! This allows to have access directly to errors within your text editor or IDE.

Using within Sublime 3 text editor

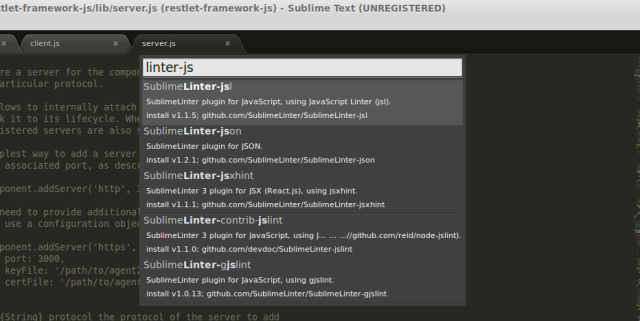
Sublime 3 provides an integration with both Jscs and JSHint that relies on the generic module SublimeLinter

Installing plugins into Sublime 3

The very first thing to do here is to install the Package Control for Sublime 3. There are two approaches at this level. They are described at the link https://packagecontrol.io/installation. You can either copy the provided code within the Sublime console or save the corresponding package into the folder .config/sublime-text-3/Packages under your home directory.

Having done that, you can then the Sublime Linter module and its associated modules leveraging the Package Control. The following link gives you precious hints about the way to do this: http://www.sublimelinter.com/en/latest/installation.html:

  • Open with the shortcut Ctrl + Shit + p
  • Type Install
  • Select Package Control : Install Package
  • Type Enter
  • Type jshint
  • Select the package SublimeLinter-jshint
  • Type jscs
  • Select the package SublimeLinter-jscs
  • Type Enter

Sublime Console
Sublime Install SublimeLinter

You have just to restart the editor and you will see the messages directly within editors.

Seeing them in action

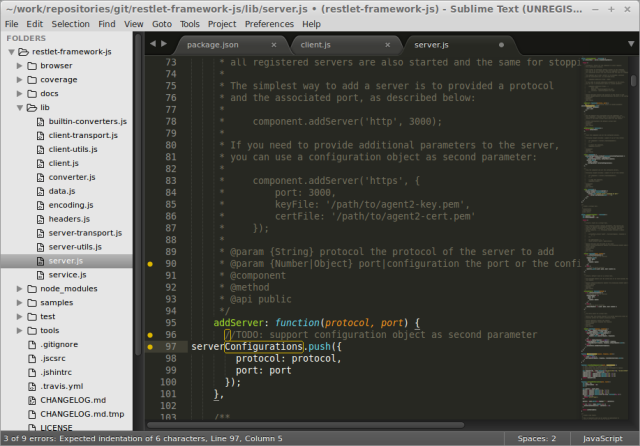
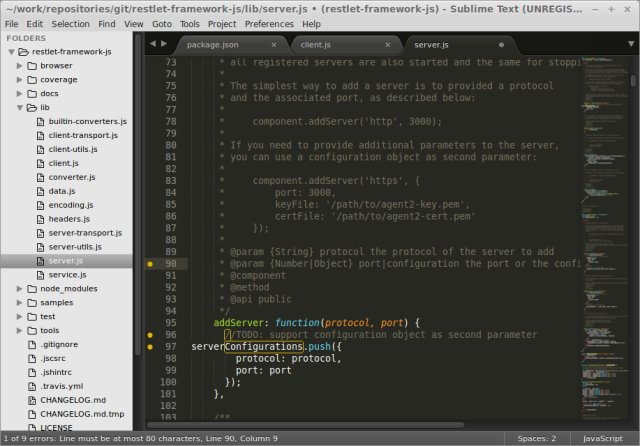
Sublime Linter allows to display problems using a circle (yellow or red) in the margin and corresponding message in the editor footer when selecting a line.

Following screenshots show this:

Linter messages
Linter messages

Posted in JavaScript | 1 Comment

Implementing bulk updates within RESTful services

In a first post, we describe how to design a Web API (i.e. RESTful service). It deals with foundations on the way to implement REST principles. You can have a look at this post at the URL https://templth.wordpress.com/2014/12/15/designing-a-web-api/.

The latter mainly focuses on the way to implement CRUD operations but doesnt tackle bulk updates. The aspect is really important since it allows to minize the interactions with the server since they correspond to network round trips. In the current post, we will tackle with this aspect and the way to implement it independently from the server side implementations.

We use the contact sample all along the post that we will extend to support bulk operations.

Implementing bulk adds

In our previous post, we saw how to add a single contact within a Web API. We will describe here how to extend this feature to support the addition of a set of contacts.

Request

Commonly collection resource already uses the method POST to add a single element to the collection. Thats why we need to implement a mechanism to support several on a same method POST. As a matter of fact having another resource that uses an action name in resource path like /contacts/bulk isnt RESTful, so not the right approach.

Two approaches can be considered to support several actions and contents on a same method POST:

  • Content based. The collection resource accepts both single element and collection of elements for its method. According to the input payload, the processing detect if a single or a bulk adding must be done.
  • Action identifier based. An identifier of the action to handle is provided within the request using for example a custom header. multiple element input

For the first approach, we can have the following request in the case of a single element:

POST /contacts
Content-Type: application/json
{
    "firstName": "my first name",
    "lastName": "my last name",
    (...)
}

And the following in the case of a bulk update:

POST /contacts
Content-Type: application/json
[
    {
        "firstName": "my first name (1)",
        "lastName": "my last name (1)"
        (...)
    },
    {
        "firstName": "my first name (2)",
        "lastName": "my last name (2)"
        (...)
    },
    (...)
]

For the second approach, we can have the following request in the case of a single element:

POST /contacts
x-action: single
Content-Type: application/json
{
    "firstName": "my first name",
    "lastName": "my last name",
    (...)
}

And the following in the case of a bulk update:

POST /contacts
x-action: bulk
[
    {
        "firstName": "my first name (1)",
        "lastName": "my last name (1)"
        (...)
    },
    {
        "firstName": "my first name (2)",
        "lastName": "my last name (2)"
        (...)
    },
    (...)
]

Response

With a single adding, the response is quite straightforward and commonly contains the two things:

  • A status code 201 (Created)
  • An header Location contained the URL of the newly created element

The following snippet describes the content of such response:

201 Created
Location: http://(...)/elements/generated-id

In the context of bulk adding, things need to be a bit adapted. As a matter of the header accepts one value and can be defined once within a response.

That said, since the semantics of a Post method is up to the RESTful service designer, we can leverage the header Link to provide this hint, as described below:

201 Created
Link: <http://(...)/elements/generated-id1>, <http://(...)/elements/generated-id2>

Note about status code 202 that is particularly applicable in such case since bulk adding can be handled asynchronously. In such case, we need do pull à dedicated resource to know the status of this processing. Tell something about the response in such case.

Such approach can only work if we consider that the processing is transactional:

  • Everything works fine and all data are inserted
  • At least one element has validation errors and nothing is added
  • One or more inserts fail and everything is rollbacked.

In this case, if there are some validation errors, the response could be as described below:

422 Unprocessable Entity
Content-type: application/json
[
    {
        "index": 1,
        "messages": [
            {
                "firstName": "The fist name should at least have three characters."
             }
        ]
    },
    {
        "index": 1,
        "messages": [
            {
                "id": "The value of the field it isn't unique."
             }
        ]
    },
]

In the case of insertion errors:

500 Internal Server Error
Content-type: application/json
[
    {
        "index": 1,
        "messages": [
            "The contact can't be added because of the error #22 (description)"
        ]
    },
    (...)
]

In the case of non-transactional processing, we need to have to return the result of bulk adding by element contained in the request payload. The status code of the response will be always 200 and errors if any described in the response paoad, as described below:

200 OK
Content-type: application/json
[
    {
        "index": 1,
        "status": "error",
        "messages": [
            "The contact can't be added because of the error #22 (description)"
        ]
    },
    {
        "index": 2,
        "status": "success",
        "auto-generated-id": "43"
    },
    (...)
]

Another approach can be to replace the whole collection representation of a list resource.

Implementing bulk replaces

The method PUT can be also used on a collection resource. In this case, this means that we want to completely replace the content of the collection associated with the resource with a new one.

Request

In this case, we can simply send the whole collection content, as described below:

PUT /contacts
Content-Type: application/json
[
    {
        "firstName": "my first name (1)",
        "lastName": "my last name (1)"
        (...)
    },
    {
        "firstName": "my first name (2)",
        "lastName": "my last name (2)"
        (...)
    },
    (...)
]

Response

This approach requires to be transactional: either the representation is replaced, either it isnt.

If the request is successful, we can simply have the following response:

204 No Content

In the case of errors, we can have similar contents than with the bulk additions described in a previous section. For example:

422 Unprocessable Entity
Content-type: application/json
[
    {
        "index": 1,
        "messages": [
            {
                "firstName": "The fist name should at least have three characters."
             }
        ]
    },
    {
        "index": 1,
        "messages": [
            {
                "id": "The value of the field it isn't unique."
             }
        ]
    },
]

Before ending this section, we need to deal with the subject of auto-generated identifiers of elements. As a matter of fact, when providing a list content, the Web API might need to do some inserts into the store and have the strategy to auto-generate identifiers. We reach here the limit of the feature since a method PUT needs to be idempotent and with auto-generated identifiers, we wont have the exactly list representation content if we send again the same request. For that reason, we should use another approach for such use case.

HTTP also provides the method PATCH that allows to implement partial updates of the state of a resource.

Implementing bulk updates

In this section, we will tackle the way to implement bulk updates based on the HTTP method PATCH. The latter targets partial updates of resource states and is particularly suitable for bulk updates. We will describe in this section of to use it for such use case?

Request

Using the method PATCH is from far the most convenient way to partially update the collection associated with a resource. We dont have to send the whole collection but only the elements we want to update. In fact, such approach allows to control which updates we want to do (add, update or delete). Whereas we are free to use the format we want to describe the operations to execute on data, some standard formats are however available.

JSON Patch (https://tools.ietf.org/html/rfc6902) can be used in this context. It corresponds to a JSON document structure for expressing a sequence of operations to apply to a JSON document. A similar XML format named XML patch framework: http://tools.ietf.org/html/rfc5261 also exists.

We use below the JSON Patch format in JSON.

The content provided corresponds to an array of JSON structures that can have the attributes:

  • Attribute op that describes the operation on the described element. In our context, values add, remove and update are relevant.
  • Attribute path that allows to identify the element involved within the JSON document. This attribute can be omitted in the case of an add operation.
  • Attribute value that contains the content of the element to use for the operation

The following code describes how to update the list of contacts by adding a new one and removing the one with identifier 1:

PATCH /contacts
[
    {
        "op": "add", "value": {
            "firstName": "my first name",
            "lastName": "my last name"
        }
    },
    {
        "op": "remove", "path": "/contacts/1"
    }
]

Response

Regarding the response, we are exactly in the same scenario than for the element additions. We can consider that the bulk updates are transactional or not. We can notice that the specification JSON Patch describes anything regarding the response content. Its up to you to use the most appropriated format.

In the case of a transactional approach, we have the following scenario:

  • Everything works fine and all data are inserted
  • At least one element has validation errors and nothing is added
  • One or more inserts fail and everything is rollbacked.

In such case, we can have a response content as described below:

200 OK
Content-type: application/json
[
    {
        "index": 1,
        "status": "error",
        "messages": [
            "The contact can't be added because of the error #22 (description)"
        ]
    },
    {
        "index": 2,
        "status": "skipped"
    },
    (...)
]

In the case of a non transactional approach, elements can be added unitarily even if some of them cant be added because of errors. The response content would be

200 OK
Content-type: application/json
[
    {
        "index": 1,
        "status": "error",
        "messages": [
            "The contact can't be added because of the error #22 (description)"
        ]
    },
    {
        "index": 2,
        "status": "success",
        "auto-generated-id": "43"
    },
    (...)
]

Posted in REST, Web API | Tagged , , , , , | 1 Comment

Implementing an OData service with Olingo

We saw in previous post that Olingo can be used as a client to access existing OData services. The tool also provides the ability to implement custom OData services with Java. We will focus in this post on the way to do that. Moreover this post aims to provide first insights about the way to use Olingo to implement OData services.

Since the subject is a bit wide, we will only deal with the way to manage entities and query them.

Configuring Olingo in the project

The simplest way to configure the Olingo client to implement an OData v4 service is to use Maven and define the server as a dependency in the file pom.xml, as described below:

<?xml version="1.0" encoding="UTF-8"?>
<project (...)>
    <modelVersion>4.0.0</modelVersion>
    (...)
    <dependencies>
        <dependency>
            <groupId>org.apache.olingo</groupId>
            <artifactId>odata-server-core</artifactId>
            <version>4.0.0-beta-02</version>
        </dependency>
    </dependencies>
   (...)
</project>

Maven can be used then to generate the configuration for your IDE. For example, for Eclipse, simply execute the following command:

mvn eclipse:eclipse

Now we have a configured project, lets start to implement the processing. We will focus here on the way to implement a simple service that implement entity CRUD (create, retrieve, upate and delete).

Creating the entry point servlet

Olingo provides out of the box a request handler that is based on the servlet technology. For that reason, an entry point servlet must be implemented to configure an Olingo application and delegate request processing to the OData handler.

We will describe first the global skeleton of an Olingo entry point servlet. We will focus then on each part of its processing.

public class OlingoEntryPointServlet extends HttpServlet {
    private EdmProvider edmProvider;
    private List<Processor> odataProcessors;

    (...)

    @Override
    public void init(ServletConfig config) throws ServletException {
        super.init();

        this.edmProvider = createEdmProvider();
        this.odataProcessors = getODataProcessors(edmProvider);
    }

    @Override
    protected void service(HttpServletRequest request,
                                             HttpServletResponse response)
                                             throws ServletException, IOException {
        try {
            doService(request, response);
        } catch (RuntimeException e) {
            throw new ServletException(e);
        }
    }

    private void doService(HttpServletRequest request,
                                             HttpServletResponse response) {
        OData odata = createOData();

        ServiceMetadata serviceMetadata = createServiceMetadata(
                                                              odata, edmProvider);

        ODataHttpHandler handler = createHandler(
                       odata, serviceMetadata, odataProcessors);
        handler.process(request, response);
    }
}

The first thing the servlet needs is an instance of OData that corresponds to the root object for serving factory tasks and support loose coupling of implementation (core) from the API. This instance must be dedicated to serve a request and cant be shared by multiple threads. So we need to be careful when using it within a servlet that is a singleton by default. The class allows to get an instance using its method newInstance, as described below:

private OData createOData() {
    return OData.newInstance();
}

We need then to create the service metadata based on an EDM provider that will be used then to create the request handler, as described below:

private ServiceMetadata createServiceMetadata(
                           OData odata, EdmProvider edmProvider) {
    EdmxReference reference = new EdmxReference(
        URI.create("../v4.0/cs02/vocabularies/Org.OData.Core.V1.xml"));
    reference.addInclude(new EdmxReferenceInclude(
                                               "Org.OData.Core.V1", "Core"));
    List<EdmxReference> references = Arrays.asList(reference);
    return odata.createServiceMetadata(edmProvider, references);
}

The last thing we need to create to serve a request consists in the handler itself. Its used to handle the OData requests and is based on a set of processors. Its responsible to select the right registered processor and delegate then the processing. The create of an handler leverage the method createHandler of the class OData. We can notice that a specific handler must be create per request. The following content describes how to create one:

private ODataHttpHandler createHandler(
                 OData odata, ServiceMetadata serviceMetadata, 
                 List<Processor> odataProcessors) {
    ODataHttpHandler dataHandler = odata.createHandler(serviceMetadata);
    if (odataProcessors!=null) {
        for (Processor odataProcessor : odataProcessors) {
            dataHandler.register(odataProcessor);
        }
    }
    return dataHandler;
}

Now we have the entry point servlet implemented, we can focus on the definition of the data structure we will use for our OData service.

Defining data structure

Before bring able to handle requests, we need to define the data model (EDM or Entity Data Model) of our service and which endpoints allow to interact with it.

Methods of class EdmProvider

To do that, we need to create a class that extends the class EdmProvider of Olingo and override some of its methods following your needs.

For the scope of this post, only few of them need to be overriden, as described below:

  • Method getSchemas – Get the list of schemas and the elements (entity types, complex types, ) they contain. This method will be used to display data of the metadata URL (for example, /odata.svc/$metadata).
  • Method getEntityContainer – Get the different entity sets. This method will be used to display data of the service URL (for example, /odata.svc).
  • Method getEntityType – Get an entity type for a particularly full qualified name.
  • Method getEntitySet – Get the hints related to a specific entity set name.
  • Method getEntityContainerInfo

Implementing a custom EdmProvider

The first step is to create programmatically the structure of our metadata (our EDM). We can use the classes provided by Olingo to do this, as described below:

// Schema
Schema schema = new Schema();
schema.setNamespace(namespace);
schema.setAlias(namespace);
schemas.add(schema);

// Entity types
List<EntityType> entityTypes = new ArrayList<EntityType>();
schema.setEntityTypes(entityTypes);

EntityType entityType = new EntityType().setName("MyEntityType");
complexTypes.add(complexType);

List<PropertyRef> pkRefs = new ArrayList<PropertyRef>();
PropertyRef ref = new PropertyRef().setPropertyName("pkName");
pkRefs.add(ref);
entityType.setKey(pkRefs);

Property property = new Property();
property.setName("myProperty");
property.setType(EdmPrimitiveTypeKind.String.getFullQualifiedName());
entityType.getProperties().add(property);

// Complex types (similar approach than for entity types)
List<ComplexType> complexTypes = new ArrayList<ComplexType>();
schema.setComplexTypes(complexTypes);

ComplexType complexType = new ComplexType().setName("MyComplexType");
complexTypes.add(complexType);

Property property = new Property();
property.setName(field.getName());
property.setType(field.getEdmType());
complexType.getProperties().add(property);

Now we have built the metadata for our EDM model, we can create our own implementation of the class EdmProvider to leverage these metadata. A sample implementation is provided below. Setting the metadata can be done using its method setSchemas.

public class EdmGenericProvider extends EdmProvider {
    private String containerName = "default";

    @Override
    public List<Schema> getSchemas() throws ODataException {
        return schemas;
    }

    @Override
    public EntityContainer getEntityContainer() throws ODataException {
        EntityContainer container = new EntityContainer();
        container.setName(containerName);

        // EntitySets
        List<EntitySet> entitySets = new ArrayList<EntitySet>();
        container.setEntitySets(entitySets);

        // Load entity sets per index
        for (Schema schema : schemas) {
            for (EntitySet schemaEntitySet
                           : schema.getEntityContainer()
                                                    .getEntitySets()) {
                EntitySet entitySet = new EntitySet().setName(
                        schemaEntitySet.getName()).setType(
                            new FullQualifiedName(
                                       schemaEntitySet.getType().getNamespace(),
                                       schemaEntitySet.getType().getName()));
                entitySets.add(entitySet);
            }
        }

        return container;
    }

    private Schema findSchema(String namespace) {
        for (Schema schema : schemas) {
            if (schema.getNamespace().equals(namespace)) {
                return schema;
            }
        }

        return null;
    }

    private EntityType findEntityType(Schema schema, String entityTypeName) {
        for (EntityType entityType : schema.getEntityTypes()) {
            if (entityType.getName().equals(entityTypeName)) {
                return entityType;
            }
        }

        return null;
    }

    @Override
    public EntityType getEntityType(FullQualifiedName entityTypeName)
                                              throws ODataException {
        Schema schema = findSchema(entityTypeName.getNamespace());
        return findEntityType(schema, entityTypeName.getName());
    }

    private ComplexType findComplexType(Schema schema, String complexTypeName) {
        for (ComplexType complexType : schema.getComplexTypes()) {
            if (complexType.getName().equals(complexTypeName)) {
                return complexType;
            }
        }

        return null;
    }

    @Override
    public ComplexType getComplexType(FullQualifiedName complexTypeName)
                                                 throws ODataException {
        Schema schema = findSchema(complexTypeName.getNamespace());
        return findComplexType(schema, complexTypeName.getName());
    }

    private EntitySet findEntitySetInSchemas(String entitySetName)
                                                 throws ODataException {
        List<Schema> schemas = getSchemas();
        for (Schema schema : schemas) {
            EntityContainer entityContainer = schema.getEntityContainer();
            List<EntitySet> entitySets = entityContainer.getEntitySets();
            for (EntitySet entitySet : entitySets) {
                if (entitySet.getName().equals(entitySetName)) {
                    return entitySet;
                }
            }
        }
        return null;
    }

    @Override
    public EntitySet getEntitySet(FullQualifiedName entityContainer,
                                    String entitySetName) throws ODataException {
        return findEntitySetInSchemas(entitySetName);
    }

    @Override
    public EntityContainerInfo getEntityContainerInfo(
            FullQualifiedName entityContainerName) throws ODataException {
        EntityContainer container = getEntityContainer();
        FullQualifiedName fqName = new FullQualifiedName(
                                container.getName(), container.getName());
        EntityContainerInfo info = new EntityContainerInfo();
        info.setContainerName(fqName);
        return info;
    }

    public void setSchemas(List<Schema> schemas) {
        this.schemas = schemas;
    }

    public void setContainerName(String containerName) {
        this.containerName = containerName;
    }
}

Handling requests

As we saw previously, OData requests are actually handled by processors within Olingo. A processor simply corresponds to a class that implements one or several processor interfaces of Olingo. When registering processors, Olingo will detect the kinds of requests it can handle based on such interfaces.

Here are the list of interfaces of Olingo that a processor can implement. They are all located under the package org.apache.olingo.server.api.processor. Here is a list of all of them that are related to entities and properties. Additional ones focus actions, batch, delta, errors, service document and metadata.

  • Interface EntityCollectionProcessor – Processor interface for handling a collection of entities, i.e. an entity set, with a particular entity type.
  • Interface CountEntityCollectionProcessor – Processor interface for handling counting a collection of entities.
  • Interface EntityProcessor – Processor interface for handling a single instance of an entity type.
  • Interface PrimitiveProcessor – Processor interface for handling an instance of a primitive type, i.e. primitive property of an entity.
  • Interface PrimitiveValueProcessor – Processor interface for getting value of an instance of a primitive type, e.g., a primitive property of an entity.
  • Interface PrimitiveCollectionProcessor – – Processor interface for handling a collection of primitive-type instances, i.e. a property of an entity defined as collection of primitive-type instances.
  • Interface ComplexProcessor – Processor interface for handling an instance of a complex type, i.e. a complex property of an entity.
  • Interface ComplexCollectionProcessor – Processor interface for handling a collection of complex-type instances, i.e. a property of an entity defined as collection of complex-type instances.
  • Interface CountComplexCollectionProcessor – Processor interface for handling counting a collection of complex properties, i.e. an EdmComplexType.

We will focus here on the way to handle entities. We will deal with other element kinds like primitive and navigation properties in an upcoming à venir post.

We already describe how to register a processor, so we can directly tackle the way to implement them.

Handling entities

Before being able to actually implement processing within processors, we need to know to create entities and how to get data from it programmatically using Olingo. We dont describe here how to handle navigation properties.

Building entities

When returning back data from the underlying store, we need to convert them to entities. The following code describes how to create an entity from data:

Entity entity = new EntityImpl();

// Add a primitive property
String primitiveFieldName = (...)
Object primitiveFieldValue = (...)
Property property = new PropertyImpl(null, primitiveFieldName,
                                              ValueType.PRIMITIVE,
                                              primitiveFieldValue);
entity.addProperty(property);

// Add a complex property
String complexFieldName = (...)
LinkedComplexValue complexValue = new LinkedComplexValueImpl();
List<Property> complexSubValues = complexValue.getValue();

String subPrimitiveFieldName = (...)
Object subPrimitiveFieldValue = (...)
Property complexSubProperty = new PropertyImpl(null, subPrimitiveFieldName,
                                              ValueType.PRIMITIVE,
                                              subPrimitiveFieldValue);
complexSubValues.add(complexSubProperty);

Property property = new PropertyImpl(null, complexFieldName,
                ValueType.LINKED_COMPLEX, complexValue);
properties.add(property);

Extracting data from entities

In order to store data into a store, we need to extract received data from entity objects. The following code describes how fill maps from an entity and its properties.

public Map<String, Object> convertEntityToSource(Entity entity) {
    Map<String, Object> source = new HashMap<String, Object>();

    convertEntityPropertiesToSource(source, entity.getProperties());

    return source;
}

private void convertEntityPropertiesToSource(
                                      Map<String, Object> source,
                                      List<Property> properties) {
    for (Property property : properties) {
        if (property.isComplex()) {
            Map<String, Object> subSource = new HashMap<String, Object>();
            convertEntityPropertiesToSource(subSource, property.asComplex());
            source.put(property.getName(), subSource);
        } else if (property.isPrimitive()) {
            source.put(property.getName(), property.getValue());
        }
    }
}

Getting the EDM entity set for a request

Before being able to execute a request, we need to know on which EDM entity set it applies. This can be deduced from the URI resource paths. The implementation of the method getEdmEntitySet below is very simple and return the hint from request:

private EdmEntitySet getEdmEntitySet(
                       UriInfoResource uriInfo)
                       throws ODataApplicationException {
    List<UriResource> resourcePaths = uriInfo.getUriResourceParts();
    UriResourceEntitySet uriResource
                                    = (UriResourceEntitySet) resourcePaths.get(0);
    return uriResource.getEntitySet();
}

Getting the primary key values

OData allows to specify the primary key of an entity directly within the URL like this /products('my id') or /products(pk1='my composite id1',pk2='my composite id2'). The following method getPrimaryKeyValues retrieve the set of values of the primary from path:

private Map<String, Object> getPrimaryKeys(
                        UriResourceEntitySet resourceEntitySet) {
    List<UriParameter> uriParameters = resourceEntitySet.getKeyPredicates();
    Map<String, Object> primaryKeys = new HashMap<String, Object>();
    for (UriParameter uriParameter : uriParameters) {
        UriParameter key = keys.get(0);
        String primaryKeyName = key.getName();
        Object primaryKeyValue = getValueFromText(key.getText());
        primaryKeys.put(primaryKeyName, primaryKeyValue);
    }
    return primaryKeys;
}

Structure of an handling method

Methods of processors to handle OData requests follows similar structures:

  • First they get the EdmEntitySet corresponding to the request based on the UriInfoResource. This element allows to get hints of the structure of data we will manipulate. See section for more details.
  • We can eventually get hints from request headers like content type.
  • We need then to get instance(s) to serialize and eventually deserialize payloads. Such instances can be obtained from the OData instance with methods createSerializer and createDeserializer based on the content type we want to use.
  • In the case of entity adding or updating, we need to deserialize the received entity. We cam then extract data from entity to handle them. See section for more details.
  • Mainly in the case of getting entity sets and entity set count, we can get options (system query parameters like $filter and $select) to parameterize processing.
  • If the OData response must contain an entity or an entity set, we need to build it and then serialize it. See section for the way create an entity or a list of entities.
  • During the serialization and if the metadata must be contained in the response (different than ODataFormat.JSON_NO_METADATA), we need to create the context URL.
  • Finally we need to set the response headers.

We are now ready to handle different requests to get and manage entities.

Getting list of entities

Getting such list must be implemented within the method readEntityCollection of our processor.

public void readEntityCollection(ODataRequest request,
                                ODataResponse response, UriInfo uriInfo,
                                ContentType requestedContentType)
                                throws ODataApplicationException,
                                              SerializerException {
    EdmEntitySet edmEntitySet = getEdmEntitySet(
                                                      uriInfo.asUriInfoResource());

    // Load entity set (list of entities) from store
    EntitySet entitySet = (...)

    ODataFormat format = ODataFormat
               .fromContentType(requestedContentType);
    ODataSerializer serializer = odata.createSerializer(format);

    ExpandOption expand = uriInfo.getExpandOption();
    SelectOption select = uriInfo.getSelectOption();
    InputStream serializedContent = serializer
            .entityCollection(
                edmEntitySet.getEntityType(),
                entitySet,
                EntityCollectionSerializerOptions.with()
                     .contextURL(
                          format == ODataFormat.JSON_NO_METADATA ? null
                             : getContextUrl(serializer, edmEntitySet,
                                                          false, expand, select, null))
            .count(uriInfo.getCountOption()).expand(expand)
            .select(select).build());

    response.setContent(serializedContent);
    response.setStatusCode(HttpStatusCode.OK.getStatusCode());
    response.setHeader(HttpHeader.CONTENT_TYPE,
    requestedContentType.toContentTypeString());
}

We dont describe here the way to handle queries provided with the query parameter $filter. For more details, we can refer to a previous post that describes the way implement them: https://templth.wordpress.com/2015/04/03/handling-odata-queries-with-elasticsearch/.

Adding an entity

Adding an entity must be implemented within the method createEntity of our processor, as described below.

public void createEntity(ODataRequest request,
                                            ODataResponse response,
                                            UriInfo uriInfo,
                                            ContentType requestFormat,
                                            ContentType responseFormat)
                                            throws ODataApplicationException,
                                                         DeserializerException,
                                                         SerializerException {
    String contentType = request.getHeader(HttpHeader.CONTENT_TYPE);
    if (contentType == null) {
        throw new ODataApplicationException(
                "The Content-Type HTTP header is missing.",
                HttpStatusCode.BAD_REQUEST.getStatusCode(),
                Locale.ROOT);
    }

    EdmEntitySet edmEntitySet = getEdmEntitySet(
                                             uriInfo.asUriInfoResource());

    ODataFormat format = ODataFormat.fromContentType(requestFormat);
    ODataDeserializer deserializer = odata.createDeserializer(format);
    Entity entity = deserializer.entity(request.getBody(),
                                                 edmEntitySet.getEntityType());

    // Actually insert entity in store and get the result
    // This is useful if identifier is autogenerated
    Entity createdEntity = (...)

    ODataSerializer serializer = odata.createSerializer(format);
    ExpandOption expand = uriInfo.getExpandOption();
    SelectOption select = uriInfo.getSelectOption();
    InputStream serializedContent = serializer
             .entity(edmEntitySet.getEntityType(),
                          createdEntity,
                          EntitySerializerOptions
                              .with()
                              .contextURL(
                                format == ODataFormat.JSON_NO_METADATA ? null
                                : getContextUrl(serializer, edmEntitySet, true,
                                            expand, select, null))
             .expand(expand).select(select).build());
    response.setContent(serializedContent);
    response.setStatusCode(
                        HttpStatusCode.CREATED.getStatusCode());
    response.setHeader(HttpHeader.CONTENT_TYPE,
    responseFormat.toContentTypeString());
}

Loading an entity

Loading an entity must be implemented within the method loadEntity of our processor, as described below.

public void readEntity(ODataRequest request,
                                         ODataResponse response,
                                         UriInfo uriInfo,
                                         ContentType requestedContentType)
                                         throws ODataApplicationException,
                                                      SerializerException {
    EdmEntitySet edmEntitySet = getEdmEntitySet(
                                           uriInfo.asUriInfoResource());

    UriResourceEntitySet resourceEntitySet
                 = (UriResourceEntitySet) uriInfo.getUriResourceParts().get(0);

    // Get primary key(s)
    Map<String, Object> primaryKeys = getPrimaryKeys(resourceEntitySet);

    // Load entity from store
    Entity entity = (...)

    if (entity == null) {
        throw new ODataApplicationException(
                       "No entity found for this key",
                       HttpStatusCode.NOT_FOUND.getStatusCode(),
                       Locale.ENGLISH);
    }

    ODataFormat format = ODataFormat
                  .fromContentType(requestedContentType);
    ODataSerializer serializer = odata.createSerializer(format);
    ExpandOption expand = uriInfo.getExpandOption();
    SelectOption select = uriInfo.getSelectOption();
    InputStream serializedContent = serializer
            .entity(edmEntitySet.getEntityType(),
                        entity,
                        EntitySerializerOptions
                          .with()
                          .contextURL(
                             format == ODataFormat.JSON_NO_METADATA ? null
                             : getContextUrl(serializer,edmEntitySet, true,
                                            expand, select, null))
            .expand(expand).select(select).build());
    response.setContent(serializedContent);
    response.setStatusCode(HttpStatusCode.OK.getStatusCode());
    response.setHeader(HttpHeader.CONTENT_TYPE,
        requestedContentType.toContentTypeString());
}

Updating an entity

Updating an entity must be implemented within the method updateEntity of our processor, as described below. We can check if the update must be partial or complete based on the HTTP method used for the call.

public void updateEntity(ODataRequest request,
                                             ODataResponse response,
                                             UriInfo uriInfo,
                                             ContentType requestFormat,
                                             ContentType responseFormat)
                                             throws ODataApplicationException,
                                                          DeserializerException,
                                                          SerializerException {
    String contentType = request.getHeader(HttpHeader.CONTENT_TYPE);
    if (contentType == null) {
        throw new ODataApplicationException(
                  "The Content-Type HTTP header is missing.",
                  HttpStatusCode.BAD_REQUEST.getStatusCode(),
                  Locale.ROOT);
    }

    EdmEntitySet edmEntitySet = getEdmEntitySet(
                                             uriInfo.asUriInfoResource());

    ODataFormat format = ODataFormat.fromContentType(requestFormat);
    ODataDeserializer deserializer = odata.createDeserializer(format);
    Entity entity = deserializer.entity(request.getBody(),
                                                    edmEntitySet.getEntityType());
    // Get primary key(s)
    Map<String, Object> primaryKeys = getPrimaryKeys(resourceEntitySet);

    // Partial update?
    boolean partial = request.getMethod().equals(HttpMethod.PATCH);

    // Actually update entity in store
    Entity updatedEntity = (...)

    ODataSerializer serializer = odata.createSerializer(format);
    ExpandOption expand = uriInfo.getExpandOption();
    SelectOption select = uriInfo.getSelectOption();
    InputStream serializedContent = serializer
                .entity(edmEntitySet.getEntityType(),
                             updatedEntity,
                             EntitySerializerOptions
                                .with()
                                .contextURL(
                                   format == ODataFormat.JSON_NO_METADATA ? null
                                   : getContextUrl(serializer, edmEntitySet, true,
                                                               expand, select, null))
                .expand(expand).select(select).build());
    response.setContent(serializedContent);
    response.setStatusCode(HttpStatusCode.OK.getStatusCode());
    response.setHeader(HttpHeader.CONTENT_TYPE,
                                        responseFormat.toContentTypeString());
}

Deleting an entity

Deleting an entity must be implemented within the method deleteEntity of our processor, as described below.

public void deleteEntity(final ODataRequest request,
                         ODataResponse response, final UriInfo uriInfo)
                         throws ODataApplicationException {
    EdmEntitySet edmEntitySet = getEdmEntitySet(
                                                       uriInfo.asUriInfoResource());

    UriResourceEntitySet resourceEntitySet
                        = (UriResourceEntitySet) uriInfo.getUriResourceParts().get(0);

    // Get primary key(s)
    Map<String, Object> primaryKeys = getPrimaryKeys(resourceEntitySet);

    // Actually delete the entity based on these parameters
    (...)

    response.setStatusCode(
             HttpStatusCode.NO_CONTENT.getStatusCode());
}

Posted in Olingo | Tagged , , , | 1 Comment

What can OData bring to ElasticSearch?

The key concept is that such integration allows to implement an indirection level between the logical schema, defined with OData, and the physical one, defined within ElasticSearch.

This allows to transparently apply processing strategies according to the mapping between these two schemas.

All along the post, we will describe in details the concepts behind an integration between OData and ElasticSearch. We can notice that all the general concepts apply to most noSQL databases.

Bridging logical and physical schemas

OData Entity Data Model

The central concepts in the EDM are entities and the relations between them. Entities are instances of Entity Types (for example, Customer, Employee, and so on) which are structured records consisting of named and typed properties and with a key. Complex Types are structured types also consisting of a list of properties but with no key, and thus can only exist as a property of a containing entity. An Entity Key is formed from a subset of properties of the Entity Type and is the way to uniquely identifying instances of Entity Types and allowing Entity Type instances to participate in relationships using navigation properties. Entities are grouped in Entity Sets. Finally, all instance containers like Entity Sets are grouped in an Entity Container.

ElasticSearch mapping

ElasticSearch defines metadata regarding the document kinds it manages within indices. These metadata allows to define types of properties and eventually their formats but also the way document they will be handled during the indexing phase (stored or not, indexed or not, analyzers to apply, ).

The following snippet describes a sample:

{
    "product": {
        "properties": {
            "name": {
                "type" : "string",
                "index": "analyzed,
                "store": true,
                "index_name" : "msg",
                "analyzer": "standard"
             },
            "description":{"type":"string"},
            "releaseDate":{"type":"date"},
            "discontinuedDate":{"type":"date"},
            "rating":{"type":"integer"},
            "price":{"type":"double"},
            "available":{"type":"boolean"},
            "hint":{"type":"string"}
    }
}

Such hints are indexing-oriented: they dont define relations between elements either constraints.

Need for an intermediate schema

As we saw, the ElasticSearch mapping focuses but doesnt contain all the neccessary hints to build an EDM. For this reason, an intermediate schema needs to be introduced.

It will contain additional hints about types (cardinalities, relations, denormalization, ). It will be used to deduce the corresponding EDM. Some hints wont be exposed through this model but will be useful when handling OData requests.

The following content describes the structure of this intermediate schema:

name (string)
pk (true | false);
minOccurs (0 | 1)
maxOccurs (integer or -1)
denormalizedFieldName (string)
notNull (boolean)
regexp (regexp);
uniqueBy (true | false)
autoGenerated (true | false)
indexed (true | false)
stored (true | false)
relationKind (parentChild | denormalized | reference)

In the case of ElasticSearch, this can be stored with the field _meta of type mappings, as described below:

{
    "properties": {
        "age": { "type":"integer" },
        "gender":{ "type":"boolean" },
        "phone":{ "type":"string" },
        "address": {
            "type": "nested",
            "properties": {
                "street": { "type":"string" },
                "city": { "type":"string" },
                "state": { "type":"string" },
                "zipCode": { "type":"string" },
                "country": { "type":"string" }
            }
        }
    },
    "_meta":{
        "constraints":{
            "personId":{ "pk":true, "type":"integer" }
        }
    }
}

Another approach consists in defining it outside ElasticSearch within the OData ElasticSearch support programatically or within a configuration file. Below is a possible solution:

MetadataBuilder builder = new MetadataBuilder();

TargetEntityType personDetailsAddressType
              = builder.addTargetComplexType(
                                  "odata", "personDetailsAddress");
personDetailsAddressType.addField("street", "Edm.String");
personDetailsAddressType.addField("city", "Edm.String");
personDetailsAddressType.addField("state", "Edm.String");
personDetailsAddressType.addField("zipCode", "Edm.String");
personDetailsAddressType.addField("country", "Edm.String");

TargetEntityType personDetailsType
               = builder.addTargetEntityType(
                                  "odata", "personDetails");
personDetailsType.addPkField("personId", "Edm.Int32");
personDetailsType.addField("age", "Edm.Int32");
personDetailsType.addField("gender", "Edm.Boolean");
personDetailsType.addField("phone", "Edm.String");
personDetailsType.addField("address", "odata.personDetailsAddress");

Data management

In the case of data management, this indirection level has an interest since the OData implementation for ElasticSearch can apply strategies regarding the kind of data. We wont dive here into details but we can distinguish these different use cases:

  • Handling primary keys. ElasticSearch manages the primary key of the entity by itself. The key isnt stored as a field in the document itself but in a special metadata called id of type string. ElasticSearch gives you the choice to provide the primary key value or let the database generate an unique string identifier for you. We can notice that only single primary keys are supported. The abstraction can integrate the best way to handle the primary and add a support for primary with other types.
  • OData supports partial updates and single property updates out of the box. ElasticSearch also provides this feature using scripts. This approach can be hidden within the OData implementation for ElasticSearch.
  • OData provides the concept navigation properties to manage links between different entities. Whereas this isnt supported natively in ElasticSearch (like for all noSQL databases), this can be simulate using parent / child support or denormalization. Based on collected metadata for the schema, the OData implementation for ElasticSearch can adapt the processing to transparently support such approaches.

Queries

For queries, the OData abstraction allows to adapt the underlying ElasticSearch queries according to the context and the element they apply on.

Simple queries

The most simpliest queries involve operators eq (equals) and ne (not equals). With ElasticSearch, we need to take care to avoid a classical pitfall. As a matter of fact, such queries need to use term queries but this can only apply in the case of document fields with type string to non indexed fields. Other types are natively supported. In the case of indexed fields are automatically analyzed, we will rather use the function contains to do a match query under the hood. As a matter of fact, a term query wont generally provide the right result.

Below here is described how such queries are handled:

  • Operator eq (equals): name eq 'my name', quantity eq 12

The following ElasticSearch query will be executed:

{
    "term" : {
        "name" : "my name"
    }
}

  • Operator eq with null value: name eq null

The following ElasticSearch query will be executed:

{
    "filtered" : {
        "query" : {
            "match_all" : { }
        },
        "filter" : {
            "missing" : {
                "field" : "name"
            }
        }
    }
}

  • Operator ne (not equals): name ne 'my name', quantity ne 12

The following ElasticSearch query will be executed:

{
    "filtered" : {
        "query" : {
            "match_all" : { }
        },
        "filter" : {
            "not" : {
                "filter" : {
                    "query" : {
                        "term" : {
                            "name" : "my name"
                        }
                    }
                }
            }
        }
    }
}

  • Operator ne with null value: name ne null

The following ElasticSearch query will be executed:

{
    "filtered" : {
        "query" : {
            "match_all" : { }
        },
        "filter" : {
            "exists" : {
                "field" : "name"
            }
        }
    }
}

Canonical functions in queries

The function contains allows to make a match query and can perfectly applied to analyzed fields.

  • Function contains: contains(name, 'my name')

The following ElasticSearch query will be executed:

{
    "match" : {
        "description" : {
            "query" : "whole",
            "type" : "boolean"
        }
    }
}

  • Function startswith: startswith(name, 'bre')

The following ElasticSearch query will be executed:

{
    "prefix" : {
        "name" : {
            "prefix" : "bre"
        }
    }
}

Handling nested fields

OData queries provides the ability to define paths with several levels. For example, expression like that are supported: address/city/name. There are several use cases depending on the relations between fields.

For example, if the field city is contained within a nested field, we can transparently adapt the ElasticSearch query to wrap it within a nested one. This can apply to all queries previously described here.

  • Operator eq (equals): address/city/name eq 'my name'

The following ElasticSearch query will be executed:

{
    "nested" : {
        "query" : {
            "term" : {
                "city.name" : "my name"
            }
        },
        "path" : "address"
    }
}

We dont go further here but we can handle the case when parent / child relations or denormalization come into account to deduce the ElasticSearch queries to execute.

Compounded queries

OData queries also support operators like and, or or not to compound all queries described previously.

  • Operator or: contains(name, 'my name') or contains(description, 'my description')

The following ElasticSearch query will be executed:

{
    "filtered" : {
        "query" : {
            "match_all" : { }
        },
        "filter" : {
            "or" : {
                "filters" : [ {
                    "query" : {
                        "match" : {
                            "name" : "my name"
                        }
                    }
                }, {
                    "query" : {
                        "match" : {
                            "description" : "my description"
                        }
                    }
                } ]
            }
        }
    }
}

Handling relations

We saw previously that we can easily and transparently handle nested fields. Its the same for parent / child relations. If we are in the case of a navigation property implemented in ElasticSearch with such feature, we can easily adapt the corresponding query and use a has_child query.

  • Operator eq (equals): address/street eq 'my street'

The following ElasticSearch query will be executed:

{
    "has_child": {
        "type": "address",
        "query": {
            "term": {
                "street": "my street"
            }
        }
    }
}

Updating the denormalized data

Denormalized data are duplicated within several ElasticSearch types in a single index or across several ones. This allows to simulate data joins and return a data graph within query results and by executing a single query.

However, there is always a data that triggers the updates of duplicated ones when updated. This data corresponds to the one that is present in the logical schema at a single place. Denormalized data dont appear within this schema since they correspond to a design choice of the physical schema.

When updating this data, the OData service will build a batch update request to update all the dependent ones. As we saw previously, we have the hints about such denormalization links within the intermediate schema. With such approach handling updates of denormalized data is completely transparent.

Posted in ElasticSearch, OData | Tagged , | Leave a comment

Handling OData queries with ElasticSearch

Olingo provides an Java implementation of OData for both client and server sides. Regarding the server side, it provides a frame to handle OData requests, specially the queries described with the OData within the query parameter $filter.

We dont provide here a start guide to implement an OData service with Olingo (it will be the subjet of another post) but focus on the way to handle queries. We first deal with the basic frame in Olingo to implement queries and then how to translate them to ElasticSearch ones. To finish, we also tackle other query parameters to control the entity fields returned ($select) and the data set returned and pagination ($top and $skip).

Handling OData queries in Olingo

Olingo is based on the concept of processor to handle OData requests. The library allows to register a processor class that implements a set of interfaces describing what it can handle. In the following snippet, we create a processor that can handle entity collection, entity collection count and entity requests.

public class ODataProviderEntityProcessor
                       implements EntityCollectionProcessor,
                                  CountEntityCollectionProcessor,
                                  EntityProcessor {
    @Override
    public void readEntityCollection(final ODataRequest request,
                                 ODataResponse response, final UriInfo uriInfo,
                                 final ContentType requestedContentType)
                  throws ODataApplicationException, SerializerException {
        (...)
    }

    @Override
    public void countEntityCollection(ODataRequest request,
                                 ODataResponse response, UriInfo uriInfo)
                    throws ODataApplicationException, SerializerException {
        (...)
    }

    @Override
    public void readEntity(final ODataRequest request, ODataResponse response,
                  final UriInfo uriInfo, final ContentType requestedContentType)
                    throws ODataApplicationException, SerializerException {
        (...)
    }
}

Imagine that we have a entity set called products of type Product. When we access the OData service with the URL http://myservice.org/odata.svc/products, Olingo will route the request to the method readEntityCollection of our processor. The objects provided as parameters will contain of the hints regarding the request and allow to set elements to return within the response.

If we want to use queries, we simply need to leverage the query parameter $filter. So if we want to get all the products with name MyProductName, we can simply use this URL: http://myservice.org/odata.svc/products?$filter=name eq 'MyProductName'. Within the processor the query expression can be reached using the parameter uriInfo, as described below:

@Override
public void readEntityCollection(final ODataRequest request,
                             ODataResponse response, final UriInfo uriInfo,
                             final ContentType requestedContentType)
              throws ODataApplicationException, SerializerException {
    FilterOption filterOption = uriInfo.getFilterOption();
    (...)
}

The query support of Olingo doesnt stop here, since it parses the query string for us and allows to based on the classical pattern Visitor. To implement such processing, we simply need to create a class that implements the interface ExpressionVisitor and uses it on the parsed expression, as described below:

Expression expression = filterOption.getExpression();
QueryBuilder queryBuilder = expression
                .accept(new ElasticSearchExpressionVisitor());

The visitor class contains the methods that can will be called when an element of the parsed expression is encountered. A sample empty implementation is described below with the main methods:

public class ElasticSearchExpressionVisitor implements ExpressionVisitor {
    @Override
    public Object visitBinaryOperator(BinaryOperatorKind operator,
                   Object left, Object right)
                     throws ExpressionVisitException,
                            ODataApplicationException {
        (...)
    }

    @Override
    public Object visitUnaryOperator(UnaryOperatorKind operator, Object operand)
                    throws ExpressionVisitException, ODataApplicationException {
        (...)
    }

    @Override
    public Object visitMethodCall(MethodKind methodCall, List parameters)
                    throws ExpressionVisitException, ODataApplicationException {
        (...)
    }

    @Override
    public Object visitLiteral(String literal)
                    throws ExpressionVisitException, ODataApplicationException {
        (...)
    }

    @Override
    public Object visitMember(UriInfoResource member)
                    throws ExpressionVisitException, ODataApplicationException {
        (...)
    }
}

This approach allows to handle several levels within queries. The returned elements of methods corresponds to the elements that will be passed as parameters to other method calls. Lets take a simple example based on the expression name eq 'MyProductName'. Here are the different method calls:

  • method visitMember. The variable member of type UriInfoResource contains potentially several parts to support something like that field1/subField2. We can here simply extract the string name and returns it.
  • method visitLiteral. The variable literal contains the value 'MyProductName'. Since we are in the case of a string literal, we need to extract the string value MyProductName and returns it. If it was an integer, we could convert it to an integer and return it.
  • method visitBinaryOperator. The variable operator contains the type of operator, BinaryOperatorKind.EQ in our case. The other parameters correspond to the values returned by the previous method.

Here is a sample implementation of methods visitMember and visitLiteral:

@Override
public Object visitLiteral(String literal)
         throws ExpressionVisitException, ODataApplicationException {
    return ODataQueryUtils.getRawValue(literal);
}

@Override
public Object visitMember(UriInfoResource member)
         throws ExpressionVisitException, ODataApplicationException {
    if (member.getUriResourceParts().size() == 1) {
        UriResourcePrimitiveProperty property
                                 = (UriResourcePrimitiveProperty)
                                              member.getUriResourceParts().get(0);
        return property.getProperty().getName();
    } else {
        List<String> propertyNames = new ArrayList<String>();
        for (UriResource property : member.getUriResourceParts()) {
            UriResourceProperty primitiveProperty
                                  = (UriResourceProperty) property;
            propertyNames.add(primitiveProperty.getProperty().getName());
        }
        return propertyNames;
    }
}

Now we have described general principles to handle OData queries within Olingo, we can focus now on how to convert these queries to ElasticSearch ones.

Implementing the interaction with ElasticSearch

Now we have tackle generic concepts and have a look at Olingo classes to implement queries, we will now focus on the ElasticSearch specific stuff. We will use the official Java client to execute such queries from Olingo processors. We leverage the class SearchRequestBuilder and create it using the method prepareSearch of the client. The query can be configured within this request. The corresponding result data will be then convert to OData entities and send back to the client.

The following code shows a sample implementation of such processing within the processor previously described:

@Override
public EntitySet readEntitySet(EdmEntitySet edmEntitySet,
                  FilterOption filterOption, SelectOption selectOption,
                  ExpandOption expandOption, OrderByOption orderByOption,
                  SkipOption skipOption, TopOption topOption) {
    EdmEntityType type = edmEntitySet.getEntityType();
    FullQualifiedName fqName = type.getFullQualifiedName();

    QueryBuilder queryBuilder = createQueryBuilder(
                                  filterOption, expandOption);

    SearchRequestBuilder requestBuilder = client
                          .prepareSearch(fqName.getNamespace())
                          .setTypes(fqName.getName())
                          .setQuery(queryBuilder);
    configureSearchQuery(requestBuilder, selectOption,
                          orderByOption, skipOption, topOption);

    SearchResponse response = requestBuilder.execute().actionGet();

    EntitySet entitySet = new EntitySetImpl();
    SearchHits hits = response.getHits();
    for (SearchHit searchHit : hits) {
        Entity entity = convertHitToEntity(
                            searchHit, type, edmProvider);
        entity.setType(fqName.getName());
        entitySet.getEntities().add(entity);
    }

    return entitySet;
}

We will now describe how to actually create ElasticSearch queries.

Creating ElasticSearch queries from OData requests

With OData, we can get all data for a particular type but also filter them using a query. If we want to get all data, we can use the query . In other case, the ElasticSearch query creation will be a bit more tricky. The latter will be created within a Olingo query expression visitor and can have serveral levels.

The following code describes the entry point method to create the ElasticSearch query:

public QueryBuilder createQueryBuilder(FilterOption filterOption) {
    if (filterOption != null) {
        Expression expression = filterOption.getExpression();
        return expression.accept(
             new ElasticSearchExpressionVisitor());
    } else {
        return QueryBuilders.matchAllQuery();
    }
}

We dont describe here all possible cases but focus on two different operators. The first one is the equality one. Its implementation is pretty straightforward using a match query within the method visitBinaryOperator of our expression visito. We need however be careful to handle the case where the value is null.

@Override
public Object visitBinaryOperator(
                  BinaryOperatorKind operator, Object left, Object right)
                     throws ExpressionVisitException, ODataApplicationException {
    if (BinaryOperatorKind.EQ.equals(operator)) {
        String fieldName = left;
        Object value = right;
        if (value!=null) {
            return QueryBuilders.matchQuery(fieldName, value);
        } else {
            return QueryBuilders.filteredQuery(QueryBuilders
                .matchAllQuery(), FilterBuilders.missingFilter(fieldName));
        }
    }
    (...)
}

We can notice that in the case where the field isnt indexed, a term query would be much relevant.

In the case of an operator, we only one level within the ElasticSearch query. The Olingo approach based on an expression visitor allows to compound more complex queries. We can take the sample of an operator that associates to sub queries, something like with OData query name eq 'MyProductName' and price eq 15. In this case, the following visitor methods will be called successfully:

  • method visitMember with member name.
  • method visitLiteral with value 'MyProductName'.
  • method visitBinaryOperator with operator eq that create the first sub query (query #1).
  • method visitMember with member price.
  • method visitLiteral with value 15.
  • method visitBinaryOperator with operator eq that create the second sub query (query #2).
  • method visitBinaryOperator with operator and. The first parameter corresponds to query #1 and the second to query #2.

Having understand this, we can leverage an ElasticSeach filter to create our composite query within the method visitBinaryOperator, as describe below:

@Override
public Object visitBinaryOperator(
                  BinaryOperatorKind operator, Object left, Object right)
                     throws ExpressionVisitException, ODataApplicationException {
    (...)
    if (BinaryOperatorKind.AND.equals(operator)) {
        return QueryBuilders.filteredQuery(QueryBuilders.matchAllQuery(),
                                  FilterBuilders.andFilter(
                                      FilterBuilders.queryFilter((QueryBuilder) left),
                                      FilterBuilders.queryFilter((QueryBuilder) right)));
    }
    (...)
}

We describe here how to translate OData queries to ElasticSearch ones by leveraging the expression visitor of Olingo. We took concrete samples of an equals query and of a composite one.

In the next section, we will describe how to take into account nested fields within queries

Handling queries on nested fields

Within our equals operator support, we didnt take into account the fact that OData supports sub fields. As a matter of fact, we can have something like that: details/fullName eq 'My product details'. The field details would be an OData complex field and an ElasticSearch nested field. For such use case, we need to extend our support of the operator to handle both case:

  • normal fields with match or term queries
  • complex fields with nested queries.

The following code describes an adapted version of our method visitBinaryOperator to support this case:

@Override
public Object visitBinaryOperator(BinaryOperatorKind operator,
                  Object left, Object right)
                     throws ExpressionVisitException,
                            ODataApplicationException {
    if (BinaryOperatorKind.EQ.equals(operator)) {
        List<String> fieldNames = getFieldNamesAsList(left);
        if (fieldNames.size() == 1) {
            String fieldName = fieldNames.get(0);
            Object value = right;
            if (value!=null) {
                return QueryBuilders.matchQuery(fieldName, value);
            } else {
                return QueryBuilders.filteredQuery(QueryBuilders
                  .matchAllQuery(), FilterBuilders.missingFilter(fieldName));
            }
        } else if (fieldNames.size() > 1) {
            Object value = right;
            if (value!=null) {
                return QueryBuilders.nestedQuery(getRootFieldName(fieldNames),
                    QueryBuilders.matchQuery(
                              getTargetNestedFieldNames(fieldNames), value));
            } else {
                return QueryBuilders.nestedQuery(getRootFieldName(fieldNames),
                    QueryBuilders.filteredQuery(QueryBuilders
                  .matchAllQuery(), FilterBuilders.missingFilter(
                           getTargetNestedFieldNames(fieldNames))));
            }
        }
        (...)
    }
    (...)
}

The last point will see here consists in the ability to parameterizing a subset of returned data.

Parameterizing the returned data

OData allows to specify a subset of data to return. This obviously applies to queries based on the following query parameters:

  • $select to specify which fields will be included in returned entities
  • $top to specify the maximum number of returned entities
  • $skip to specify the index of the first entity of the returned subset

The two last parameters are particularly convenient to implement data pagination with OData.

Such parameters can be used to parameterized the ElasticSearch search request, as described below:

public void configureSearchQuery(
                       SearchRequestBuilder requestBuilder,
                       SelectOption selectOption, OrderByOption orderByOption,
                       SkipOption skipOption, TopOption topOption) {
    requestBuilder.setSize(1000);

    if (selectOption!=null) {
        for (SelectItem selectItem : selectOption.getSelectItems()) {
            requestBuilder.addField(selectItem.getResourcePath()
                                      .getUriResourceParts().get(0).toString());
        }
    }

    if (topOption!=null) {
        requestBuilder.setSize(topOption.getValue());
    } else {
        requestBuilder.setSize(DEFAULT_QUERY_DATA_SIZE);
    }

    if (skipOption!=null) {
        requestBuilder.setFrom(skipOption.getValue());
    }
}

Posted in ElasticSearch, OData, Olingo, Queries | Tagged , , , | 1 Comment

Handling multiple actions for a POST method

When we go a bit ahead from the CRUD scope of REST, we often need to support several actions for a same resource. This is typically handled by a method POST and we need to implement a processing to route the request to the right method in our resource class to handle it. This can be since the provided payload for such requests and responses can be different.

In addition, we want to leverage the conversion support provided by REST frameworks to directly work on beans for the payloads.

Generally in this context, we use a dedicated header to specify the action to execute. In the following we will use a custom header named x-action.

In this post, we will describe how to implement such use cases with REST frameworks like Restlet and JAX-RS compliant ones.

Use case

In general, methods POST of list resources is used to create a corresponding element. We can imagine to need to have several actions to handle for a method POST:

  • an action to add a set of elements. In this case, the input content corresponds to an array.
  • an action against the list itself like reorder, clear, and so on

The use of method POST for actions can also be used for other kinds of resources.

With REST, a wrong approach consists in using the action names within the resource path itself. For example with previous samples, we could have: /elements/reorder or /elements/clear. A better approach is to use a specific header to specify which action must be executed.

Moreover, when implementing such approach with Java REST frameworks, we can generally work with low-level elements but also with beans describing structured request and response contents. So we need to find out a way to select the right methods to invoke the action processing and them the right parameters.

With Restlet

Restlet provides no support for this out of the box. At the moment, only query parameters can be declaratively used within an annotation Post to select a request. The following code describes how to use this feature:

@Post("?action=single")
public void handleSingleAdd(TestBean contact) {
    (...)
}

With Restlet, we need to implement an annotated method that will route the request to the right handling method. This routing method must works on low-level API of Restlet to have access to the custom header and directly use the converter service to create the right instances of objects for requests.

The following code describes how to implement such processing. We introduce a method getInputObject to convert the input content into beans and handle errors if the right content isnt provided.

private <T> T getInputObject(Representation representation, Class<T> clazz) {
    try {
        return getConverterService().toObject(representation, clazz, this);
    } catch (Exception ex) {
        throw new ResourceException(
              Status.CLIENT_ERROR_UNPROCESSABLE_ENTITY);
    }
}

@SuppressWarnings("unchecked")
@Post
public Representation handleAction(Representation representation)
                                                             throws IOException {
    Series<Header> headers = (Series<Header>)
       getRequestAttributes().get("org.restlet.http.headers");

    String actionHeader = headers.getFirstValue("x-action", "single");
    if ("single".equals(actionHeader)) {
        TestBean bean = getInputObject(representation, TestBean.class);
        TestBean returnedBean = handleSingleAction(bean);
        return getConverterService().toRepresentation(returnedBean);
    } else if ("list".equals(actionHeader)) {
        List<TestBean> beans = getInputObject(representation, List.class);
        List<TestBean> returnedBeans = handleMultipleAction(beans);
        return getConverterService().toRepresentation(returnedBeans);
    } else {
        throw new ResourceException(Status.CLIENT_ERROR_BAD_REQUEST);
    }
}

With JAX-RS

With JAX-RS, there are two possible ways to implement such feature. The first one is based on a filter and the other one directly implemented within the resource. Lets started with the first one.

Approach #1

JAX-RS allows to define pre-matching filters that are called before the resource call and even before the framework choose which resource class and method will be used to handle the request. With this approach, we are able to update the requested URI to add something to tell the resource which method to use.

Following code describes the implementation of such filter:

@PreMatching
@Provider
public class PreMatchingFilter implements ContainerRequestFilter {
    @Context
    private ResourceInfo resourceInfo;

    @Context
    private UriInfo uriInfo;

    @Override
    public void filter(ContainerRequestContext requestContext)
                                                                       throws IOException {
        String xActionValue = requestContext.getHeaderString("x-action");
        if ("list".equals(xActionValue)) {
            requestContext.setRequestUri(
                   URI.create(uriInfo.getRequestUri() + "/list"));
        } else {
            requestContext.setRequestUri(
                   URI.create(uriInfo.getRequestUri() + "/single"));
        }
    }
}

The corresponding resource implementation will provide for its methods a sub path to select which will be called for each case:

@Path("/beans")
public class BeansResource {
    @POST
    @Path("/single")
    public void testContent(TestBean content) {
        (...)
    }

    @POST
    @Path("/list")
    public void testContent(List<TestBean> content) {
        (...)
    }

The main drawback of this approach is that some sub paths are defined and they can potentially be called directly from the client.

Approach #2

The second approach handles the routing of the request handling directly within the resource class. This feature is part of the JAX-RS specication and is called . The latter gives us some control over the chosen resource to handle the request.

We need to define an abstract class that will be returned for the path by the JAX-RS annotatéd method for the path and the method that support several actions. According to the value of the header xx, we actually return a sub class that provides processing for such case.

Following code describes an implementation of such approach within a resource class:

@Path("/beans")
public class BeansResource {
    public static abstract class AbstractHeaderResource {
    }

    @Path("/")
    public AbstractHeaderResource doSomething(
                  @HeaderParam("X-Header") String xHeader) {
        if ("list".equals(xHeader)) {
            return new ListResource();
        } else {
            return new SingleResource();
        }
    }

    public static class SingleResource extends AbstractHeaderResource {
        @POST
        public Response doSometing(TestBean bean) {
            (...)
            return Response.ok("single action").build();
        }
    }

    public static class ListResource extends AbstractHeaderResource {
        @POST
        public Response doSometing(List<TestBean> beans) {
            (...)
            return Response.ok("list action").build();
        }
    }
}

We can notice that the class AbstractHeaderResource can define an abstract method is the actions manage all the same content format:

public static abstract class AbstractHeaderResource {
    @POST
    public abstract Response doSometing(TestBean bean);
}

Posted in JAX-RS, REST, Restlet | Tagged , , , , , | Leave a comment